
German Chocolate French Macarons
After traveling to New York last month and visiting Ladurée, I’ve become a little more obsessed with french macarons. Not gonna lie, I’ve been thinking about them quite often and regretting not bringing home more from the city. More than anything I think visiting Ladurée inspired me to become better at making macarons and my mom’s birthday last weekend seemed like a fitting opportunity to make a batch, this time flavored like german chocolate cake, since that’s her favorite dessert!
GERMAN CHOCOLATE FRENCH MACARONS

I happened to have the ingredients on hand in my pantry to make the german chocolate macarons, but none left to spare. Of course that meant I needed the macarons to turn out and luckily they did! It was a good feeling to place the shells in the oven and watch them rise, feet and all. If you’ve ever made french macarons before, the term “feet” is one worth celebrating!
These German chocolate cake macarons were only my 3rd attempt at making them, and although far from perfect, they were much improved from my last batch.
HOW TO MAKE GERMAN CHOCOLATE MACARONS
**Below I’m sharing an updated recipe for German Chocolate French Macarons, using my go-to Italian meringue method. After many years of making macarons, I’ve gained plenty of experience that I’m happy to share with you through this recipe. Please reach out with any questions!*
German Chocolate French Macarons
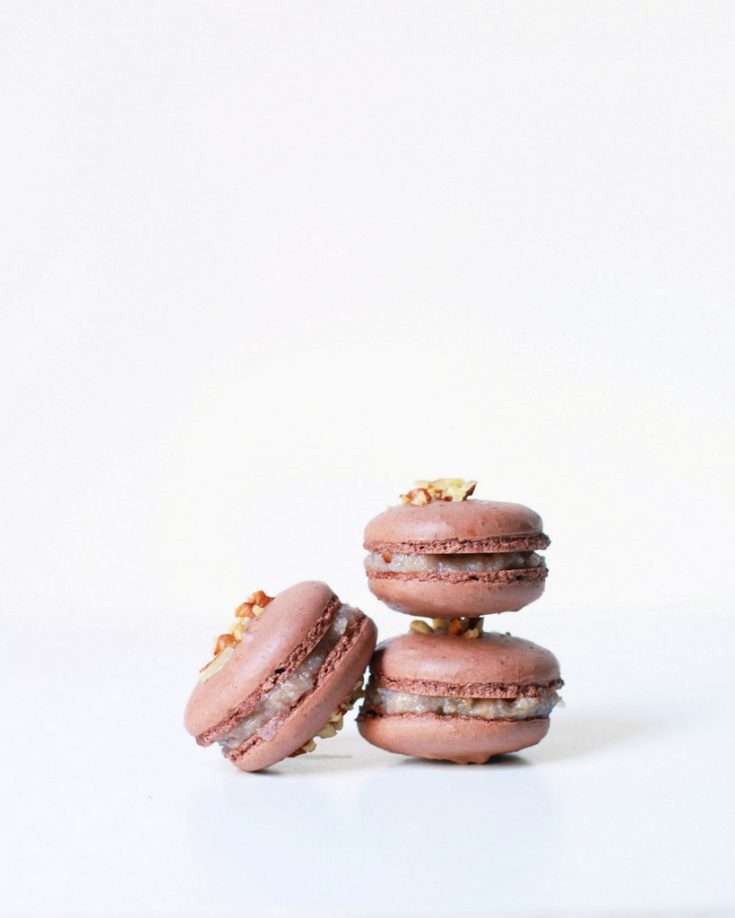
German Chocolate French Macarons with german chocolate filling - dairy and gluten free
Ingredients
- For the French Macaron Shells:
- 106 grams of almond meal
- 86 grams powdered sugar
- 20 grams cocoa powder
- 41 and 45 grams of egg whites divided
- 115 grams of granulated sugar
- 79 grams of water
- dash of cream of tartar or lemon juice for stabilizing
- 1/4 cup chopped pecans for tops of shells
- Additional supplies:
- Piping bag fitted with a small round tip
- Additional piping bag for piping filling
- For the German Chocolate filling:
- 1/2 cup vegan butter
- 1 cup full fat cooconut milk or milk alternative
- 1 cup granulated sugar
- 1 1/4 cup finely chopped pecans
- 2.5 cups unsweetened shredded coconut
- 3 egg yolks whisked
- teaspoon of vanilla
- pinch of salt
Instructions
For the macarons:
INSTRUCTIONS
For the macarons:
First things first! Wipe down the mixing bowl and whisk attachment with vinegar to remove any built up residue. This will ensure that the egg whites whisk up properly!
Prep and measure all of the ingredients using a kitchen scale.
Prep a piping bag with a round tip. I use Wilton tip 10.
Line 2 baking sheets with parchment.
Combine measured almond meal, powdered sugar and cocoa powder together in a bowl. Sift one time to remove any lumps, discarding of them, then mix together to break up clumps.
Make a well in the center of the dry mix and pour the 41 grams of measured egg whites into the center of the dry mixture. Fold together until blended and mix well until fully incorporated. The finished mix will be paste-like. Set aside.
For the sugar syrup:
To make the sugar syrup, heat granulated sugar and water in a pot on medium heat with a candy thermometer attached to the side. **Be careful to make sure the thermometer is not touching the bottom of the pot**.
Once the thermometer’s temperature reaches approximately 200 degrees F, place the 45 grams of measured egg whites in the stand mixer and whisk on medium speed, to soft peaks.
Add a drop of lemon juice or dash of cream of tartar to stabilize, THEN continue whisking.
If the egg whites are at soft peaks before the syrup reaches 248 F, turn the mixer down to low speed to keep the egg whites moving.
Watch the sugar syrup closely!
As soon as the sugar syrup reaches 248 degrees F, remove from heat.
Quickly increase mixer speed to medium and begin slowly pouring the sugar syrup down the side of your mixing bowl into the meringue until thoroughly combined.
THEN increase the mixing speed to high and whisk sugar and meringue together until glossy and stiff peaks form and the meringue has cooled. (The meringue should keep its form.)
Gently transfer finished meringue into the almond/powdered sugar/cocoa mixture in thirds, making sure that it’s fully incorporated before adding the additional 3rd of meringue.
Continue to fold the batter in a circular motion, going around the edges of the bowl, then once through the center. Repeat these steps until smooth and thick ribbons of batter run off the spatula.
**Be careful not to over-mix**
You want the batter to be slightly thick, but not so thin that it does not hold the ribbon shape. Err on the side of caution.
Transfer batter to the prepped piping bag(s).
Pipe 1" rounds about 1" apart on a silpat mat, piping until the sheet is full.
Be sure to hold the piping bag about 1/2 inch directly above the baking sheet when piping the rounds.
*Tap the macarons on the counter three times to release air bubbles.
*Pop any air bubbles that might’ve come to the surface, using a scribe or even a toothpick. Top every other piped shell with a dusting of chopped peans.
Before placing the macs in the oven, allow them to rest until a proper skin has formed on the outside of the shell. This can take anywhere from 20-30 minutes. For the large shells I recommend 30 minutes total, depending on humidity. Test by touching the center of the piped macs with a clean finger. They should be dry to touch with no batter coming off on fingers.
Preheat oven to 300 degrees F.
Once dry to touch, place the macarons in the middle rack of the oven.
Feet will form halfway through the baking process.
Bake for 15-18 minutes.
You can open the oven after the first 15 minutes to test the shells. Wiggle gently from side to side to see if they need more time. A fully baked macaron should be sturdy when tested.
Once fully baked, remove from oven and allow 15-20 minutes to cool before attempting to remove the shells from the silpat/parchment paper.
Once macarons are completely cool, gently remove from parchment paper/silpat.
Repeat same steps to bake the remaining macaron batter.
For the german chocolate filling:
Pour, milk, butter and sugar into a saucepan over medium high heat until it begins to boil.
Reduce heat to low and slowly whisk in egg yolks until fully in corporated.
Pour in pecans, coconut, vanilla and pinch of salt and bring back to medium heat.
Allow the mixture to bubble and thicken (about 3 minutes), then remove from heat.
Transfer filling to the fridge to fully cool before filling the french macarons.
Macaron Assembly:
Evenly pipe rounds of cooled german chocolate filling into the center of the bottom of each macaron shell. Top with second shell to create a sandwich.
Transfer the finished macarons into the fridge and allow at least two hours to mature. 12 hours or overnight preferred.
Serve and enjoy!
Notes
NOTES
Place macarons in an airtight container until filled. They will keep for 3 days in the fridge and 6 months in the freezer.

If you love french macarons and german chocolate cake, I highly, highly recommend making these macarons! You’ll love the sweet and subtle cocoa flavor of the shells, paired with the dairy and gluten free coconut pecan filling.
Although macarons can be a little intimidating at first, I assure you with practice, each batch will become easier and easier!
Most importantly, my mom was absolutely delighted by her sweet birthday gift, which was a reward in-itself.
And for an extra reward, I enjoyed tea and a few leftover macarons on the morning of the first day of Fall as the rain began to fall. I must say, it was a wonderful way to start the new season.
Thanks as always for reading and Happy Fall! Much more to share soon.
xo
All Images are photographed and owned property of Posh Little Designs. All Rights Reserved 2014
Oh my gosh, your first day of fall sounds so ideal! Love it! Thanks for sharing!
Thanks Brandie! Hope you had a great first day of Fall too!
I spent it getting a few fall/winter clothing items, so not bad, I say! ;)
Not bad at all! You’re way ahead of me!
Oh my, these look divine! =)
Thanks Christina! They were great! Can’t wait to make them again!